How to uninstall Skype App in Windows 11/10
Skype #Skype

Skype is Microsoft’s in-house communication tool, which is used for voice calls, video calls, messaging, sharing screen, and at many other places. While it is still in Enterprise where Microsoft products have a significant presence, it is not popular among consumers. If you do not use Skype App at all, then in this post, we will learn how to uninstall the Skype App. We can do it via the Start Menu, Settings, using a PowerShell command or a free app uninstaller to remove apps.
You can remove or uninstall the Skype App using these methods:
Skype comes in two versions. One that comes from the Microsoft Store, and the second, EXE, which one can install by downloading it from the official website.
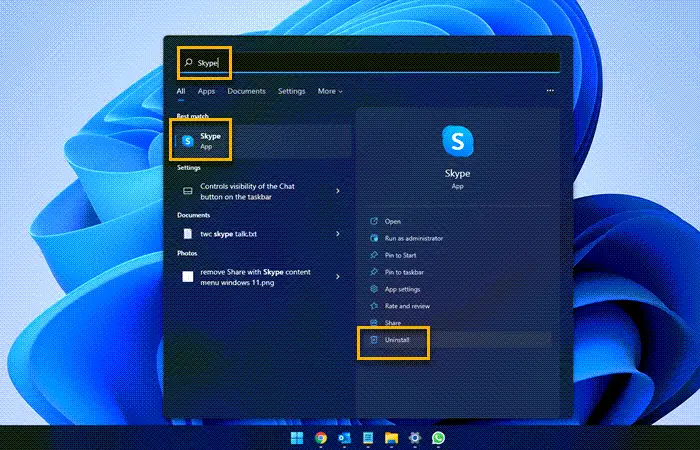
1] Uninstall Skype App from the Start Menu

The simplest way to uninstall apps is with a right-click. There two ways, one which is new with recent feature update of Windows.

There is another uninstall option on the right side of the listing which also reveals some quick action for the app.
2] Uninstall Skype and Calendar app via Settings

The first method works fine, but you can also uninstall via the Settings
3] Use a PowerShell command to remove the Skype app
If you are a power user, this method works like a charm.
Open PowerShell with Admin privileges, and execute the Remove App package command for the Skype App:
Get-AppxPackage Microsoft.SkypeApp | Remove-AppxPackage
Once the execution is complete, the Skype App will be uninstalled.
4] Uninstall from Control Panel
Skype can also be installed by directly downloading from the official webpage. It is the EXE version fo Skype, which is different from the Store version. If you have installed this version, you need to use the Add/Remove program to uninstall Skype from Windows 10.
]]>
5] Use a third-party freeware

You can also use CCleaner, Store Applications Manager, 10AppsManager or AppBuster to uninstall unwanted apps in Windows 10.
So as you can see, it is easy to uninstall the Skype App using any of the methods. Use PowerShell with precaution, and use the specific command. The settings menu is useful when you need to uninstall multiple apps, else the right click on the Start menu method works great.
TIP: This post will show you how to completely uninstall Skype for Business.
If you wish to reinstall apps, you may do so via the Microsoft Store – or use these PowerShell commands to reinstall pre-installed apps.