Embed With Elliot: Debounce Your Noisy Buttons, Part I
Elliot #Elliot

“Psst…hey buddy! Wanna see the sweetest little debouncing routine this side of Spokane? C’mon over here. Step right over those bit-shift operators, they don’t bite. Now look at this beauty right here: I call her The Ultimate Debouncer(tm)!”
Everybody who works with microcontrollers eventually runs into the issue of switch bounce or “chatter”, and nearly everyone has their own favorite solution. Some fix it in hardware, others fix it in software. Some hackers understand chatter, and others just cut-and-paste the classic routines. Some folks even try to ignore it, and they might even get lucky, but everyone’s luck runs out sometimes.
In the next two “Embed with Elliot” installments, I’ll look a little bit at bouncing, look into doing hardware debouncing both the simple way and the right way, and build up a basic software routine that demonstrates some of the principles and which works just fine, though it’s not optimized. We’ll be laying the groundwork.
In the next installment, I’ll let you in on my personal favorite debounce routine. It’s a minor tweak on a standard, but with some special sauce that’s worth spreading around. I’ll call it the Ultimate Debouncer(tm), but will it stand up to the scrutiny of the Hackaday commenteers? (How’s that for a cliffhanger?!?)
For now, though, let’s look into switch bounce and the standard ways to fix it in hardware and software.
The Problem
To you and me, when you press a pushbutton, it goes from an open circuit to a closed one, and that single transition defines the button “press”. But the reason that it’s so clear-cut to us is because we perceive things pretty slowly. To a microcontroller, which is able to test a button’s state as often as a few million times per second, it’s not on-off at all.
When you physically press a normal pushbutton, two pieces of metal come into contact with each other. If these two tiny sheets of metal aren’t perfectly flat or perfectly aligned (and they’re not) then they can make and break contact a few times before being firmly enough squished together that they’re always conducting. To a microcontroller the button appears to be pressed many times for extremely short durations, when you think you’ve just pressed it once. Debouncing is all about making sure that you and the microcontroller agree about when a button push or release event happened.
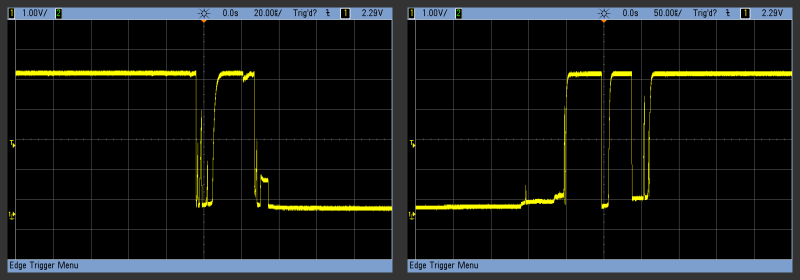
Here’s some oscilloscope plots of me pressing and releasing a plain-vanilla tactile switch that’s hooked up to a microcontroller. This particular button is much worse on the release, bouncing around almost every time and for longer, than it is on the press. So much so that I had to use different time-scales on the scope to make them both visible. But see how the voltage transitions between logic high and low before it finally settles out? That’s bounce in action.
Before tackling the debouncing problem, let’s pause to think about when button bounce matters. As demonstrated above, it’s only the effective number of button presses that we and the microcontroller don’t agree on. After a couple of milliseconds have elapsed, we both agree that the button is or isn’t currently pressed. It’s only during the very fast transition that we disagree.
 So if your code only needs to establish that a button has been pressed at all, button bounce may not matter all that much. To light up an LED when the button is pressed and turn it off when it’s released, you don’t need to debounce; the human being looking at the light won’t notice that it’s flickered ever so briefly. Your code may have wasted a few cycles going back and forth between the on and off states, but it’s not likely to be catastrophic.
Button bounce matters most when you care about counting the number of button presses. We all know the frustration of poorly-debounced rotary encoders that skip steps — these plagued most every car radio from the mid-90s that I’ve encountered. If the microcontroller, with it’s super-high-resolution world-view, sees more transitions than we do, things go wrong. We need to fix that.
Fix it in Hardware
The good news about contact bounce is that it can be entirely eliminated with a little bit of hardware. You can do it “good enough” or you can do it right, but if you’re going to physically debounce your buttons you can read the rest of this section and get back to work, ignoring the following software foolery and even Part II of this series. There’s a certain logic to a hardware solution to a hardware problem.
Most microcontrollers have internal pullup resistors that can be activated for any given GPIO pin. This lets you establish a definite logic state on a button when it’s not pressed by pulling the voltage back up from ground. More capable microcontrollers allow you to choose a pullup or pulldown resistor on the pin, and even select among possible values for the resistance and more. What matters is that we’ve got an internal or external pullup resistor of value Rp1 holding the microcontroller-side of the button in a logic high state when it’s not grounded.
Then we press the button. The button connects and disconnects to ground before finally settling down. We wish to smooth these wiggles out. Or as a frequency-domain engineer would say, we want to lowpass filter the input. Whichever way you look at it, the solution is as simple as adding another resistor and a capacitor.
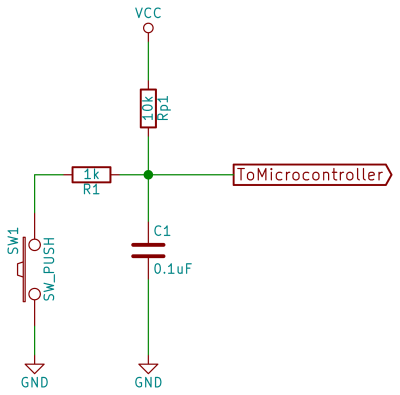
The simplest hardware solution, which works most of the time is to debounce with a resistor and capacitor. It’s a couple-cent solution that takes up little board space using surface-mount parts. Practically, you pick R and C so that the product R*C (in ohms and farads, respectively) are in the ballpark of the time you’d like to debounce for. Here, I’m using the microcontroller’s internal pullup resistor, which is around 10K ohms, and a 100nF capacitor, which gives 0.001 seconds — a millisecond — on the release. The press uses a 1K resistor, and it has to be significantly lower than the pullup to guarantee that the switch settles on a low voltage. It’s necessary because dumping the capacitor directly through the switch produces unwanted high-frequency voltage noise.
The simple RC filter here is still only a partial solution, though. If it’s running on 5V, for instance, your microcontroller wants to switch between logic low and high at 2.5V. While the filter smooths things out fairly well, it doesn’t guarantee that you don’t get unlucky bounces that wiggle around just as the voltage on the capacitor is reaching 2.5 V. If you pick the product of RC large enough, you’ll get away with it most of the time.
Hysteresis: The Full Fix
To get it right all of the time, what you’d like is a voltage signal that moves as rapidly as possible through the murky mid-rail voltage region. It’s quite common to use a pre-conditioning logic chip with hysteresis to clean up the switching action. Logic chips like the 74HC14 or 40106 will do just that for you.
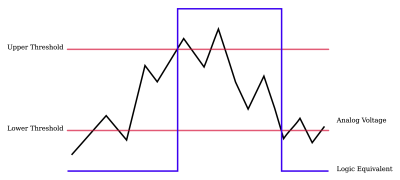 In our case, hysteresis means that instead of one voltage threshold, right in the middle, there are two: one-third and two-thirds of the maximum logic voltage are common. A switch with hysteresis uses the upper threshold when it’s last seen the low state, and the lower threshold when it’s in the high state. This leaves the range between the two thresholds as a “dead band” where no switching ever takes place, and this solves our problem perfectly.
(Note that thermostats work exactly this way — they trip the heater on at a lower set point than they turn it off again. If a thermostat didn’t work this way, your heater would be oscillating back and forth with every change of fractions of a degree.)
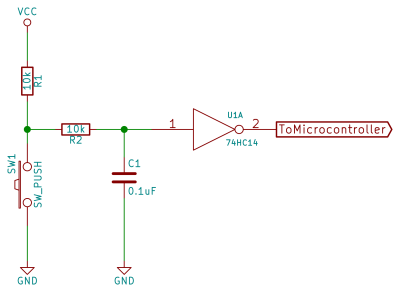 The ideal hardware solution is straightforward: a resistor and a capacitor to smooth the ripples out and a 74HC14 to provide hysteresis. A fifty-cent chip and a handful of passives can take care of up to six buttons with ease, and you don’t have to think about it at all on the software side. Sticklers will note that we have twice the pull-down current as pull-up. It’s OK — buttons usually bounce more on release than on press.
Here, the yellow trace is the smoothed output of the RC filter, and the green trace is the signal after being run through an inverter. You can see that there was considerable bounce on the press and release — this is the worst-behaving button in my collection — but that it’s mostly smoothed out by the filter. You can also see hysteresis in action. Notice the two voltage thresholds that the inverter uses: on the way up, it switches around 3.3V, and on the way down, around 1.5V.

I cherry-picked these two fairly bad transitions for the graphs here — I probably pressed the button 50 times to get these two examples. But they also illustrate what can go wrong when you only filter the bounce out. The ripple in the button press event on the left gets dangerously close to the 2.5V mid-rail switching threshold. That’s why you use an inverter with hysteresis before the microcontroller.
In conclusion, fixing contact bounce in hardware is straightforward, at least on this timescale. If you’re feeling lucky, you can filter the button’s signal with a resistor and capacitor. If you’ve got really dirty buttons, or you just want to do the job right, an inverter with hysteresis buys a lot of peace of mind and covers six buttons for just fifty cents.
Fix it in Software
I’m usually a fan of fixing hardware problems in hardware, rather than software. On the other hand, besides requiring no additional parts, the beauty of the software solution is that it’s a once-and-for-all fix: get yourself comfortable with a particular debouncing routine and you can import that one library for the rest of your life. Or maybe you’ll want a couple. Anyway, writing the code is an up-front cost that you pay just once. Besides, debouncing routines can be fun.
But keep the hardware examples above in mind, and be sure that you’re visualizing the unfiltered, bouncy signals as we work through algorithms. After all, that’s the reality that we’re trying to cope with.
There are, broadly speaking, three types of debounce routines that I’ve seen. (There may be more!)
Take a Time Out
Delay-based debouncers wait the bouncing out. After all, the mismatch between human-time and computer time isn’t all that long. Let’s say, for example, that your button never bounces for longer than five milliseconds. When the microcontroller notices a downward transition because the beginning of the bounce phase has begun, we let it wait for five milliseconds and test again. If it’s still pressed, declare that a press has happened. If not, it was just a bounce, so we repeat the cycle.
Notice what this requires, though. To detect a single button-press event, we need to know what the button state was before the press, what it is currently, and then we need to wait and check again. Even in the “simplest” routine, there’s a lot going on. We need to keep track not only of the current button state, but its past state as well.
For clarity, I’m assuming that you know how to read the button state on your particular microcontroller, and the function read_button() takes care of that. With a pull-up resistor, pressing the button will read logic low, so you might also need to invert the logic. For an AVR target, this could be as simple as testing ( (PORTD & (1 << PD2)) == 0 );. For Arduino, we’re talking digitalRead(pin_whatever) == 0.
enum ButtonStates { UP, DOWN, PRESS, RELEASE }; enum ButtonStates delay_debounce(enum ButtonStates button_state) { if (read_button()){ /* if pressed */ if (button_state == PRESS){ button_state = DOWN; } if (button_state == UP){ _delay_ms(5); if (read_button() == 1){ button_state = PRESS; } } } else { /* if not pressed */ if (button_state == RELEASE){ button_state = UP; } if (button_state == DOWN){ if (read_button() == 0){ _delay_ms(5); if (read_button() == 0){ button_state = RELEASE; } } } } return button_state; }
We define four possible states for the button to be in: the resting states of UP and DOWN and the transition states PRESS and RELEASE. And note that the function both takes as input and returns a ButtonStates value — your code calls this function like this bs = delay_debounce(bs); With this strategy the calling code stores the button state, and the debouncer knows what the previous state was when it’s called.
If the button is currently pressed, there are two possibilities that matter — either the button was just pressed last time, and we’re in the held-down state, or the button was up last time and we’re entering a possible press event. The code waits and retests the button before coming to any conclusions. The code for the non-pressed button is a similar but opposite logic.
Note that successive calls to the debounce routine move it from the just-pressed transitional state into the “button is down” state where it will spend a lot of time when someone’s mashing it. If your application code is counting button presses, life is easy: simply test if (bs == PRESS) after an update. It is guaranteed to only be in the PRESS state once per button press, and the next call will push it into DOWN. Woot!
Flaws
The fundamental weakness of this simple snippet is that you have to know how long the longest bounce event is going to be. This is tricky. Things like dirt or oil in the contacts, humidity in the air, and aging parts can change the required time-out over the life of the device. You should probably end up overestimating the bounce timeout rather than underestimating it. Is five milliseconds enough? How about ten? Jack Ganssle likes twenty to fifty milliseconds.
The other weaknesses of the particular code that I’ve written above are that it’s slow — all of those nested if statements cost. You can get rid of a couple by using elses, and I usually do, but it makes the code a tiny bit less readable.
I also use a blocking wait for the delay, which means that the CPU can’t get any work done until the button is resolved. That’s no good. The Arduino “Bounce” library, which otherwise uses a similar method, counts time with non-blocking millis() instead, which is strictly an improvement. In general, if you have a system tick at hand, it’s a better choice than using a blocking wait. Five milliseconds of time wasted is an eternity for a CPU that’s clocked in the megahertz.
Software Debouncers in the Wild
If one debounce routine isn’t enough for you, have a look at our mega-debounce roundup back in 2010. Interestingly, most of them are improved implementations of the delay debounce presented here: they sense a change and see if it’s still true in some milliseconds. Even focusing on just this one strategy, you’ve got a number of implementation options.
A couple are of the integrator type. In particular, [Kenneth Kuhn]’s debounce routine is very nice. It increments a counter every time it sees the button pressed, and decrements it when the button isn’t pressed. By using a threshold like seven counts or something, it avoids responding to initial wiggles.
By summing up the button’s count over time, it’s acting just like our RC filter hardware example — smoothing out the otherwise spiky bounces. And just like the simple RC filter example, it is possible that the counter will get right up to the threshold value and then wiggle around. Good design picks the timing so that this almost never happens, which is probably why this debouncer works so well, but we can improve it.
What this debounce routine lacks as written is the hysteresis of the ideal hardware debouncer, but that’s a simple fix. Just keep track of the button’s current state (up or down) and use different thresholds to detect button presses or releases. This complicates the otherwise beautifully simple routine, unfortunately, but it’s a very solid choice. If I couldn’t use my favorite debouncing strategy, I’d use this one.
Conclusion, and Teaser
So far, I’ve presented a few options for debouncing: a “good enough” RC filter solution, the “guaranteed” hardware solution with a filter and a switch with hysteresis, and then a standard, delay-based software debouncer that actually works better than you’d think because it keeps track of which state the button is currently in.
But I wouldn’t be writing this column unless I had something even better in mind. Keeping track of the state of every button that you’re debouncing is a hassle, and if you’re only interested in detecting button presses, for instance, the time spent on detecting releases is time wasted. But it’s hard to add hysteresis to the system without state. Or is it?
In Part II, I’ll show you a software debouncer that’s inspired by an absolute classic strategy (that I haven’t presented here yet) but with some simple improvements. It’s based on recognizing the overall pattern of a bouncing switch and adds in hysteresis to make it work, yet it’s simple enough to be implemented directly in logic (e.g. in an FPGA or CPLD or similar). I call it the Ultimate Debouncer(tm)! Join us next time to see if it can stand up to the hype.